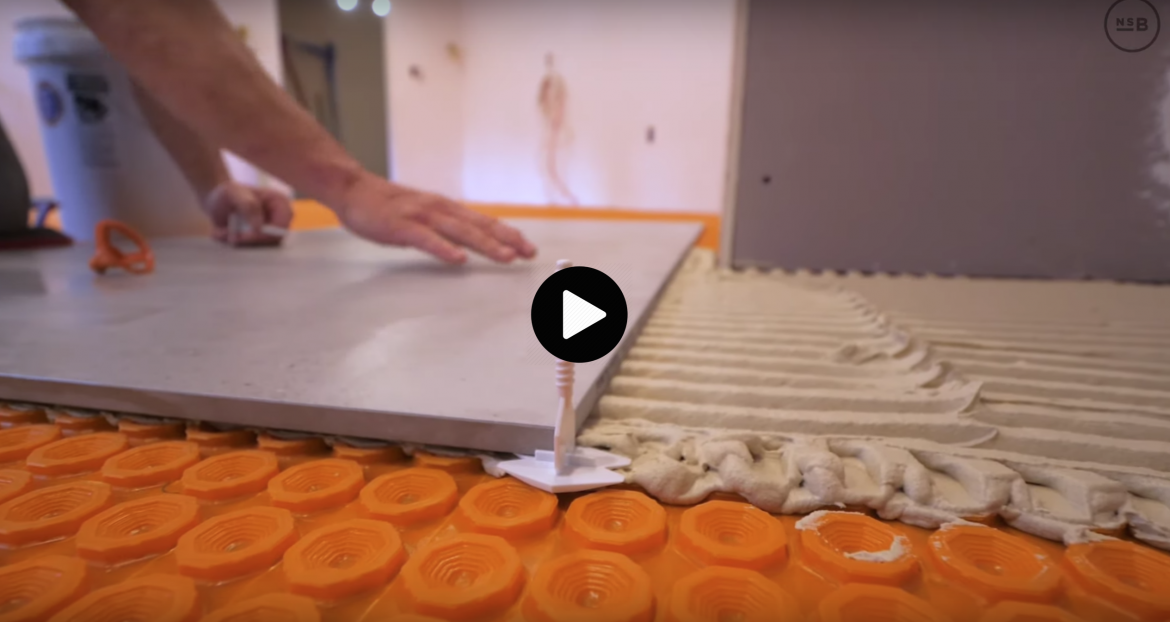
Nick Schiffer and Mike Hume of NS Builders give builders tips on how to install a Ditra-Heat-Duo membrane under large format tiles in this video of their modern, transitional kitchen renovation.
After building a self-leveling concrete slab floor, NS Builders installed a Ditra-Heat-Duo membrane. Schiffer says that the layer’s thick fleece backing prevents the cold from coming up from the concrete, keeping the tile warm. They chose grey 31.5- by -31.5 -inch tiles.
[Related: WHAT IS THE BEST WAY TO INSTALL TILES NEXT TO A CURBLESS SHOWER?]
One tip that the builders share is to mix the thinset with extra water and wet the floor down before installation. Hume reveals that the self-leveler was drying out the thinset, making it hard for the tiles to adhere. By dampening the floor, they say that the thinset will not dry out before builders can successfully bond the membrane, fleece side down, to the subfloor. After that, builders can start installing the tile on top of the orange side of the Ditra-Heat-Duo.
[Related: WHAT’S THE BEST WAY TO WATERPROOF BATHTUB WALLS?]
When laying down tile, Schiffer and Hume say that it is important to make sure that the orange honeycombs are completely filled with thinset so the tiles fully adhere, Schiffer and Hume say. To do this, they troweled both the backside of the tile and the ditra, which they call “buttering the backside.” They also used leveling clips to prevent the tile corners from lippage to ensure a quality installation.
Watch the video to learn more about the process and see how they worked around a floor-inset wine cellar.
[Related: VIDEO: TILE TRENDS FROM COVERINGS 2019]
Transcript:
We're back over at our Lincoln renovation and you saw on a previous episode that we self leveled our entire concrete floor this project and this week we're talking about tile Mike what we're standing in is the kitchen area you wanted to get done first right yeah our cabinets are ready to be insult so we started working in the kitchen area and then get out of the way tile guys are gonna start working in the living room and doing some cool details on the stairs that's gonna take down some more time so one of the things we were combating is that where we're standing right here is the original house and then the addition was the slab on grade we needed a way to bridge that so what product are you using for the underlayment so we use the Schluter D tread duo the duo has the thicker fleece backing on it helped thermally brake for your floor typically used for a radiant and what that does is when you when you're installing this on top of a concrete slab and you're reading cables through it you're not actually heating up the concrete slab you're heating up the bottom side of tile we're using that and kind of reverse here right yeah so instead we're basically trying to prevent the cold the the coldness from coming from the slab on grade into the bottom side keep the tiled one walk me through some of the installation details and some of the things actually we actually learned on this project and what is important to getting that to adhere really well we started traveling on the normal ten said you know use all the Schluter stuff but the self leveler was actually sucking some of the moisture out of that thin set too quick.
Get a good bond
We're having some bonding issues so we're actually drying out that thin set too fast how did we fix it mixed everything up just a little bit wetter and wet down the floor beforehand so we're basically taking a sponge and getting that your subfloor have get some ordinary yeah it's not it's not sucking that much it's not looking for that moisture houseware which is was the things pulling out of it inside too fast but luckily there was only like two or three sheets down I kind of noticed like we're having some corners going up it's like what are we doing wrong so we've peeled it back up you know skin stuff off and corrected it you know everything went down perfectly it's it's important to note that the manufacturer has these recommendations as well and in troweling that product on they recommend it to be a wet mix but still be able to hold the trowel anytime you're doing something like this we referred right back to the manufacturer's recommendations to make sure that we were following the guidelines from there you're basically using some pressure to get this stuff set in the thinset and letting it drop equal pressure across and you just want to make sure that everything bonds to the subfloor we don't want to have tiles popping later of course now that's the bottom side that's a thick fleece the top is actually a plastic into honeycomb if we posted up a small clip on Instagram and someone would have made the comment that the bond isn't actually to the plastic it's that the grid pattern or the honeycomb that's creating that bond which is really important to make sure we fill that entirely with thin set prior to putting the tile down right yep yeah if you watch mike has a lot of time spreading out that there's a lot a lot of may going back and forth makes and everything else so we traveled on the D etre but also on the back side of tile yeah what's that called butter in the backpack butter on the backside yeah and that's basically making sure that we have a hundred percent full coverage yeah because we're also using these leveling Clips it's oftentimes considered a way to kind of combat uneven subfloor but that's not the case here that's not the case ever you really want to start with a really level subfloor and that's really just to help the for current corners from having any lipids yeah they'll end up nice and perfectly flat we don't want anybody stuffing a toe but you and I have made a comment about what this stuff looks like and we keep we keep thinking that there's a lip yeah the way the coloring in this tile is when you get into some of these corners I keep looking at like do we nope everything's perfect so this is a thirty one and a half my thirty one and a half porcelain tile from porcelain Ossa and has this kind of almost polished concrete look oh it does we're gonna use a grout that's probably very similar to the color yep it really gets us the industrial look with with the transitional kitchen that were install right now let's go back to the beginning of the job one of the first things we did in this job was install the wine cellar yep now why was that so important to install first you have to be able to frame around it but installing that first then we have to frame up to it but that height was really dictated by the subfloor that was out here and so we had to accommodate for you know our sub for a little bit of self leveler the Schluter duo which is a little bit thicker than normal Schluter you know you're gonna have Finn set in between plus the tile so it's setting that is like well there's a lot of figuring out going on beforehand there's a lot of room for error and at you know knowing how this thing's constructed we knew that we only had one option we can only bring it up so we wanted to make sure that our elevation that we were setting was gonna be at our basically our bare minimum like you we would never be able to lower this back down so if anything we want to install it low there's a pretty big void around the stainless steel ring in the subfloor why is that too loud just for any little adjustments we're going in to finish now so if we gotta just make a tiny little tweak we can do that are you gonna fill that void yeah we'll fill that void in with a non shrink grout will go from tile on against this exterior wall to across the room run a straight edge and then we'll just be able to bring this thing up just to hit that straight edge so we know we're running in plane with our tile and then we'll be able to set that down non shrink all around it make sure that is secure.
Set the tile
And then we'll come in and get into the tile layout, and so when we get into that, we're actually going to start setting our tile, marking everything to the stainless steel ring around the outside and then we're going to bring it how to have a water jet so everything will be cut perfect around the outside of the wine cellar and we're gonna leave an eighth inch gap and fill that in with like a silicon eyes like grout they match the same color as the ground on the floor so that gives you that little breathing room between dissimilar materials which would be this in the forest yeah I like the fact that we're gonna waterjet it because you kind of have this ability to set that machine with a you know a certain diameter so every piece of tile is gonna line up a perfect an LMP not to discredit the guys behind us doing all the work but I think it's gonna make it you're gonna have human errand and it's like you and I mean if we got some bonuses as well yeah it would be extremely difficult so another cool detail for our staircase we went back and forth and we talked about doing wood doing tile how we would do different materials we end up with a really cool detail aware that that that tile from above is gonna look as though that pattern continues all the way through that sunken living room yeah I know the guys working on it right now so you'll have to stay tuned for a future episode on that we also have a really cool fireplace in the kitchen that's gonna be a huge focal point because it's gonna be so dark compared to everything else and then the final piece of this project is our guest bathroom small but we got some really cool details we took some inspiration from our friend Doug down in Austin Texas and I'm excited to see that come together but I know that's on your back burner right now because first thing is getting this set we got Itoh cabinets and yeah as always stay tuned for another episode make sure you hit the subscribe and turn on notifications so you get notified when a new episode comes out and as always i'm at NS builders on instagram and i'm mike.
Thank you!


Add new comment